
Make Job Costing Reliable in 90 Days for Contractors

Job costing means tracking every dollar of labor, materials, subcontractor work, and equipment against a specific job and cost code so you know true job profit in real time, not at closeout. Start by capturing fully burdened labor and committed costs like open POs and signed subcontracts. Do that consistently and you get accurate work-in-progress numbers, fewer overrun surprises, and sharper bids on the next job.
TL;DR:
- Accurate job costing requires capturing fully burdened labor, committed costs, and coding all expenses consistently by job and cost code.
- Weekly comparison of actual and committed costs helps early detection of overruns, preventing surprises at project closeout.
- Discrepancies in labor burden rates, miscoded transactions, late data entry, and ignoring committed costs are the most common causes of inaccurate job cost data.
- Automation and integrated ERP systems reduce manual errors by streamlining field data capture, payroll, POs, and subcontractor invoices into one platform.
- Prioritizing disciplined data entry in the first 90 days, including daily time and purchase order recordings, significantly improves overall job costing accuracy.
Table of Contents
- What Is Job Costing in Construction, and Why Does It Matter?
- What Costs Go Into a Job, and How Do You Code Them?
- How Do You Set Up a Job Costing System That Actually Works?
- Which Job-Cost Reports and KPIs Should You Watch?
- What Are the Most Common Job Costing Mistakes?
- How Does Automation Improve Job Cost Accuracy?
- What Should You Prioritize in the First 90 Days?
- See How Designflow-build Handles Job Costing End to End
- Sources
- FAQ
What Is Job Costing in Construction, and Why Does It Matter?
Standard accounting tells you whether the company made money last month. Job costing tells you whether Job #4471 made money, and whether it’s still on track. That distinction is the whole reason contractors need a separate discipline layered on top of the general ledger.
Regular bookkeeping groups expenses by type: payroll, materials, insurance. Job costing regroups those same transactions by job and cost code, so a $40,000 payroll run gets split across the three or four jobs where the crew actually worked that week. Without that split, you know your company spent $40,000 on labor. You have no idea whether Job A is bleeding money while Job B is subsidizing it.
The business payoff shows up in three places. First, work-in-progress (WIP) reporting depends on job-level cost data to calculate percent complete under the accounting standards FASB sets for long-duration contracts. Second, bonding agents and lenders read your WIP schedule as a proxy for how well you run the company. Sloppy job costing reads as sloppy management, even when the actual work is excellent. Third, job costing feeds your next estimate. If you don’t know what the last five kitchen remodels actually cost by cost code, you’re bidding on gut feel dressed up as a spreadsheet.
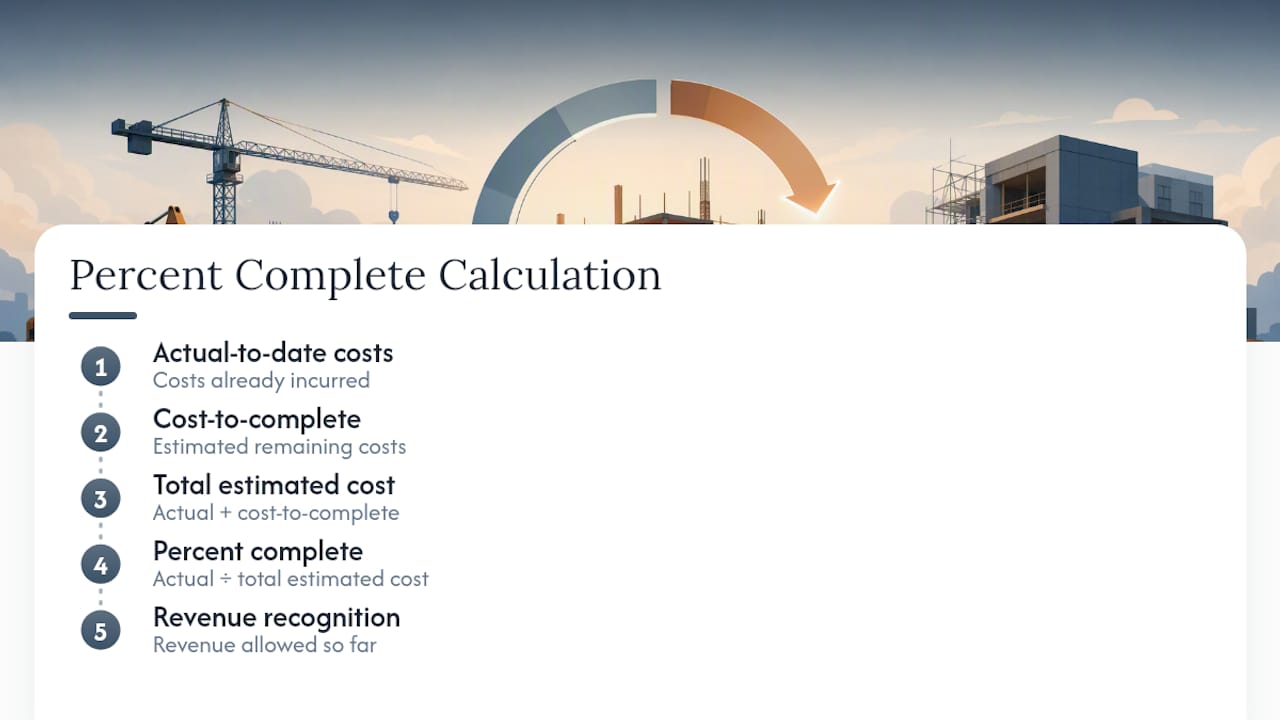
Two numbers drive everything else: actual-to-date cost and cost-to-complete. Percent complete is calculated as actual costs incurred divided by the total estimated cost (actual plus what’s left to spend), and that ratio determines how much revenue you’re allowed to recognize on the job so far. Get cost-to-complete wrong, and your percent complete is wrong, and your revenue recognition is wrong. Contractors who compare actuals to estimates by cost code while there’s still time to fix a problem catch overruns early; contractors who wait for the final invoice to add things up find out at closeout, when nothing can be done about it, according to Precision Accounting & Consulting.
What Costs Go Into a Job, and How Do You Code Them?
Every job cost falls into one of five buckets: labor, materials, subcontractors, equipment, and overhead. Miss one, or code it inconsistently, and your job cost report lies to you politely.
- Labor: wages, taxes, workers’ comp, health insurance, and benefits, fully burdened and allocated by hours worked on each job.
- Materials: lumber, concrete, fixtures, and anything delivered to or consumed on site, tied to the PO that ordered it.
- Subcontractors: framing, electrical, plumbing, and other trade work billed against a signed subcontract.
- Equipment: owned equipment charged at an internal hourly rate, plus rented equipment billed directly to the job.
- Overhead: project supervision, insurance, small tools, and other costs that support the job but aren’t a direct line item on the invoice.
Labor burden trips up more contractors than any other line. Burden is everything beyond base wage: FICA, unemployment tax, workers’ comp premiums (which vary heavily by trade classification), health insurance, and retirement contributions. A framer earning $30 an hour actually costs the job significantly more when labor burden such as payroll taxes, workers’ comp, and benefits are included, meaning estimates based on base wages alone understate true labor costs. The IRS publishes guidance on payroll tax treatment that affects how these burden calculations should be structured and reported.
Committed costs are the other blind spot. An open purchase order or a signed subcontract represents money you’re going to spend, even if the invoice hasn’t landed yet. Treating committed costs as “we’ll deal with it when the bill arrives” hides real exposure and understates how much of the budget is actually gone.
Cost codes are what make any of this usable across jobs. Adopting a structure aligned to the CSI (Construction Specifications Institute) format, or a simplified custom version with the same logic, means “concrete” always means the same thing on Job 12 as it did on Job 4. Consistency here matters more than the specific numbering scheme you pick. The moment two project managers code the same cost differently, your historical data becomes noise instead of a bidding asset.
How Do You Set Up a Job Costing System That Actually Works?
Building the system is less about software and more about sequencing. Get the structure right before you automate anything.
- Build your cost code list first. Start from a CSI-based template or borrow a simplified version from a peer contractor, then lock it. Changing cost codes mid-year breaks comparability across jobs.
- Map your chart of accounts to those cost codes. Your general ledger accounts (labor, materials, subs, equipment) should roll up cleanly into job-level detail. This is the step most spreadsheet systems handle badly.
- Set field capture rules. Require daily time entry by job and cost code, photo capture of receipts before they get lost in a truck, and a hard rule that no material gets ordered without a PO number attached.
- Enforce committed-cost entry at commitment, not at invoice. The moment a PO is issued or a subcontract is signed, it goes into the system as committed, not “pending.”
- Set a weekly review cadence. Compare actual plus committed against budget, by cost code, every week. CFMA points to consistent weekly or real-time reporting as the factor that separates contractors who catch overruns early from those who discover them at closeout.
- Reconcile monthly and update cost-to-complete. Adjust your estimate-at-completion based on what you now know about the job, not what you guessed at bid time.
Most construction budget guidance recommends keeping build-specific costs separate from full project lifecycle costs and holding a contingency of 5% to 10% to absorb the unexpected. Bake that into your budget structure from step one, not as an afterthought when change orders start arriving.
Pro Tip: Run a “committed vs. incurred” gap report every Friday. If committed costs are climbing faster than incurred costs on a job, that’s your earliest warning sign of a scope or pricing problem, weeks before it shows up in cash flow.
Spreadsheets work fine for a handful of jobs with one person entering data. They start failing when you have multiple PMs entering costs, when POs live in email instead of a system, or when reconciling committed versus actual takes more than an hour a week. That’s the point where manual tracking stops scaling, and errors from copy-paste and version conflicts start costing more than the software would.
Which Job-Cost Reports and KPIs Should You Watch?
Three reports carry most of the weight: the job cost report, budget versus actual, and the WIP schedule. Everything else is a variation on these.
The job cost report breaks a single job into cost codes and shows budget, actual, committed, and variance for each. Read it code by code, not just at the total line.
Budget versus actual should run weekly, not monthly, on active jobs, per CFMA’s guidance on reporting cadence.
The WIP schedule rolls every active job’s percent complete, billed-to-date, and cost-to-complete into one view lenders and sureties actually read. Its accuracy depends entirely on cost-to-complete estimates being current, which is why WIP reporting that satisfies sureties starts with disciplined weekly job costing, not a scramble before the audit.
Four KPIs are worth tracking on every job:
- Gross margin by job, compared against the estimated margin at bid.
- Committed versus incurred costs, to catch exposure before it hits cash flow.
- Labor efficiency, actual labor hours against estimated hours by cost code.
- Forecasted final margin, updated monthly as cost-to-complete changes.
What Are the Most Common Job Costing Mistakes?
Four mistakes account for most bad job-cost data, and none of them require new software to fix.
- Mis-burdened labor. Using a flat, outdated burden rate instead of a rate that reflects current workers’ comp and benefits costs, which understates every labor-heavy job.
- Miscoding transactions. Charging a cost to the wrong job or the wrong cost code, usually from rushed data entry or an unclear code list.
- Late entry. Time sheets and receipts submitted weeks after the fact, which means the job cost report is always describing last month, not this one.
- Ignoring committed costs. Waiting for the invoice instead of recording the PO or subcontract the day it’s signed, which is the single most common cause of “surprise” overruns.
Fixing this doesn’t require a system overhaul. Recode misfiled transactions as soon as they’re found, backfill labor burden rates at least annually, and enforce a hard rule that no purchase happens without a PO number. The governance piece matters more than any individual fix: assign one person ownership of job-cost accuracy per job, run a weekly checkpoint against budget, and spot-audit a sample of entries monthly rather than waiting for a full review. A short internal financial waste checklist works well as the basis for that audit.
Pro Tip: If a job’s variance report looks suspiciously clean every single week, that’s a red flag, not good news. It usually means costs are being staged or delayed rather than entered, which just moves the surprise to closeout.
How Does Automation Improve Job Cost Accuracy?
Automation earns its place when it removes the exact failure points above: labor burden calculated once and applied consistently, committed costs captured the moment a PO or subcontract is signed, and field data flowing into the job cost report without a spreadsheet in between. Autodesk’s research on construction job costing notes that integrating field data with budgets directly improves forecasting and cuts the manual errors that come from re-entering the same number three times across three systems.

For that integration to actually work, a system needs to connect field time entry to payroll, purchase orders to committed-cost tracking, subcontractor invoices to a real approval workflow, and equipment usage to an internal rate schedule. Lightweight tools that stage receipts and route them through a cost inbox before export, an approach vendors like JobCost use for QuickBooks-ready exports, are a reasonable intermediate step for small contractors not ready for a full ERP. But that’s a bridge, not a destination, for firms running more than a handful of jobs at once.
Designflow-build built its ERP around this exact integration gap. Field time entered on a phone flows straight into payroll with the correct burden applied. A signed subcontract becomes a committed cost the same day, not when the invoice shows up three weeks later. Dashboards update live instead of at month-end.
The platform is described as reducing manual data entry and achieving high user adoption rates among contractors, with implementation timelines typically lasting a few weeks.
Those figures are publisher-reported results, not independently audited, but they point to the real question worth asking before you buy anything: does this tool eliminate double entry, or does it just move the spreadsheet into the cloud? If you’re running fewer than five jobs with one bookkeeper doing all the entry, a disciplined spreadsheet plus the process controls above will get you most of the way there. Once you’ve got multiple PMs, multiple crews, and job counts climbing past a dozen at a time, the manual re-entry between systems becomes the actual bottleneck, not the accounting logic.
What Should You Prioritize in the First 90 Days?
The first 30 days are about discipline, not sophistication: get every crew entering daily time by job and cost code, and get every PO recorded the day it’s issued. Don’t touch reporting yet.
Days 30 to 60 are cleanup. Standardize cost codes across jobs, connect committed-cost data so POs and subcontracts show up automatically, and run your first real trend report comparing two or three similar jobs side by side.
By day 90, tie job costing directly to your WIP schedule and start feeding closed-job actuals back into your estimating process. The single biggest adoption killer isn’t the software or the cost codes. It’s field staff who see data entry as extra work with no visible payoff. Show them the weekly variance report and let them see their own numbers move the needle, and that resistance mostly disappears on its own.
— Keith
See How Designflow-build Handles Job Costing End to End
Every mistake covered above, mis-burdened labor, ignored committed costs, late field entry, comes from the same root problem: data living in three or four disconnected tools. Designflow-build replaces that patchwork (Excel, Procore, NetSuite, QuickBooks) with one AI-native ERP that connects field time, purchasing, and accounting into a single job-cost record.
That’s the practical difference for a contractor evaluating this today: instead of reconciling spreadsheets against QuickBooks every Friday, committed costs and actuals update automatically as crews log time and POs go out. The Construction ERP product ties job costing directly to WIP and payroll, while AI Blueprint Takeoff helps get estimates closer to actuals before the job even starts.
Pricing details for pro and field seats are available on the pricing page. If you’re still deciding whether spreadsheets have run their course, that’s the page to start with.
Sources
FAQ
What Is the Best Job Costing Software for Construction?
The right fit depends on job volume and complexity: small contractors with a handful of jobs often do fine with a lightweight cost-inbox tool, while firms running a dozen or more concurrent jobs typically need an integrated ERP like Designflow-build that connects field time, purchasing, and accounting automatically.
How Do I Calculate Job Costing?
Add up direct costs (fully burdened labor, materials, subcontractors, equipment) plus allocated overhead for a specific job, then compare that total against the original estimate by cost code to see where you’re ahead or behind.
What Is the Formula for Calculating Job Costs?
Total job cost equals direct costs (labor, materials, subs, equipment) plus allocated overhead, and percent complete equals actual costs incurred divided by total estimated cost (actual plus cost-to-complete).